
Out-of-the-box, the application is designed with a standard interface, depending on your persona. Personas are categorisations of users. For example, you could be an internal user of your organisation, or you could be a B2B or B2C customer. Each persona has a different interface for the system.
Standard Layout For Internal Users
The layout of the screen for internal users is divided into a standard set of primary areas.


The sections below describe each part of the standard layout, from left to right, top to bottom.
Home Logo
The home logo at the top left-hand side of the screen will always take you back to your workbench. If you ever get lost in the application, click on your organisation's logo and it will take you ‘home’ to the workbench.
Global Navigation Bar
The global navigation bar is common throughout the application and can be accessed whether working on an individual piece of work or from your mysite workbench.

The contents of the global navigation bar will vary depending on your implementation, but these are some of the common elements.
| Navigation Element | Description |
|---|---|
|
Quick Search
|
The quick search function is handy to help you get to your work fast. Imagine you receive a phone call asking how a piece of work you are carrying out is doing. This is where you can quickly search for that piece of work and then navigate to either the blade, mini view, or portal screen for that piece of work. A typical journey is to search for your work using the quick search, then go to the chronology of your work type to look for more detailed information about the progress of the work. The system searches for your work as you enter search criteria in the box. Most commonly, you would search on title data for the work, this may include IDs, client names, and addresses, depending on your configuration. Single-click a search result for the blade ‘mini view’ of your work or double-click for the ‘big’ portal view (if available). |
|
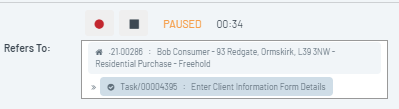
Time
|
If you use the system's time recording function, you can access your inflight time recording activities here. Use the stop or record buttons to pause or continue your time entry.
|
|
Launchpad
|
The launchpad menu acts as your toolkit. You can create work from here. This can vary from creating your ‘big’ work types, e.g., a case, legal matter, or contract, to the smaller work items you may have, such as a telephone call, SMS, or fax. The onboarding area is used to access Service Portfolios. You can use the search function at the top of the launchpad to look for work types you wish to create.
|
|
My cases / My work
|
The My Cases / My Work menu item allows you to access work you have an important role in or bookmarked. When you are working on a piece of work that you frequently access, click the star to add it to your My cases area. |
| Notifications | You can receive notifications for various activities, depending on how your system is configured. Notifications could be for something like a task being assigned to you or a piece of work you are involved in changing phase (status). For example, if you are a lawyer working on a property transaction, you may wish to receive a notification when the transaction has been completed. |
|
User Profile
|
You can click on your name at the top of the screen to access your user profile. Depending on the permissions you have in the system, you can use this to add information about yourself, such as email address, phone number, and physical address. You can even add a picture if you wish. Your profile can also be used to set your availability. When you are out of the office, you can set your status to Out of Office. You can also use the signature option to upload an image of your signature for use in documents. As part of the setup of your user account, you will be added to different teams. Teams control the work you receive and what you can do in the system. |

Contextual Information

In the top left-hand corner of the application, underneath the home logo, you will see a contextual information area.
The content of this area changes depending on where you are in the system. It shows contextual information for what is currently in focus in the portal area and is a good place to look to understand what you are currently busy with. When in a matter, this area will contain details such as its ID, title, and the type of work it is.
Contextual Action Bar

When in a Matter, the contextual action bar provides a quick route into the actions you can perform on your matter.
For example, it may allow you to bookmark the case, prepare a document related to it, modify participants, or add a new task.
It also shows you a breadcrumb which helps you to navigate up and down your work type hierarchy.

These are some common actions that appear in a contextual menu bar.
| Menu Element | Description |
|---|---|
|
Prepare
|
The Prepare menu gives you quick access to any document or email templates you can use on your work type. Your system administrator configures these and they allow you to create documents associated with your work with pre-populated information quickly. This is covered in more detail in the article Preparing a document. |
|
Participants
|
The participants menu allows you to manage the people, organisations, and teams involved in your work. For example, this could be the lender on a mortgage or the customer on an order. More information about participants is available here. |
| Milestone | Every piece of work in the system has phases. These tell us the status of a piece of work. The milestone button lets the user move the work to the next phase. |
| Create | This menu allows you to create activities for the current matter, such as telephone calls, tasks, document bundles, and virtual data rooms allowing documents to be shared with 3rd parties. |
| Finance | If you are using any of the financial elements, you can access these using the finance menu on your work item. This can include things like creating payments, invoices, or logging fees. |
| Offers (for Dispute matters) | Raise new Offers and capture details of Offers received. |
| Proceedings (for Dispute Matters) | Raise new Proceedings against the matter. This creates a new sub-matter to capture details of the Proceedings (e.g. Pre-Trial Hearing). |
| Key Dates | Review and maintain key dates. |
Left-Hand Navigation Menu
The left-hand navigation menu controls what appears in the portal area (the central part of the screen) and the contextual action bar.
Use the angle bracket at the bottom of the menu to collapse < or expand > the menu.
Workbench
On the workbench view, the left-hand navigation shows different lists and views of all of the work that you and your teams are undertaking.

Work Item View
While you are within a piece of work, the left-hand navigation takes you to the detailed element of that piece of work. For example, if you are working within a legal property case, the left-hand menu gives you views of your work, emails, chronology (the story of your work), financial elements of the transaction, and your risk overview.

In most instances, the top item on the left-hand navigation will take you to ‘home’, or the summary page for your piece of work.
Top Tip: Press the star icon to bookmark this case. It will then be available in the My cases menu.
Portal Area
The portal area is the central area of the screen and usually the place you are working or looking at information.
Depending on your implementation and where you are in the system, this will likely look different. Your trainers will provide specific information about how this area will look for each of your work items. The out-of-the-box configuration for the workbench is discussed here.

Blades
Although it's nice to have a full-screen view of the items we are working on, sometimes we just want to get a quick overview of an item while staying in the current context.
For example, if I look at items in my portfolio view on the workbench, I may want to flick through each item quickly. I can do this using the ‘blade’ view for my work item. Some types of work don’t even have a big portal view. For example, something like a task is a fairly short, discrete piece of work, and so that is likely only to have a smaller, quick-access blade view.
Blades are smaller, narrower pieces of screen that follow a common format. They pop out from the right side of the screen, allowing you to keep the context of where you were working while you view the blade.
Blades don’t always show a work item. They can also show information related to a specific work item, such as participants, fees, etc.
Each blade is divided into separate sections, known as aspects. These sections manage different functions. For example, one aspect may capture key dates, while another may capture any documents related to the case.

The work item title and common actions, such as saving and closing, are at the top of the blade.
Below this is the Ribbon Bar, which, amongst other things, allows the user to set the overall status of the work. For example, clicking the Generate Document button in the Prepare Document blade will start the document creation process.
Navigation bars at the foot of the blade link to more blades. Clicking these opens the relevant blade to the right-hand side.