
What are Permissions?
Global Permissions and Role-based Permissions
Global Permissions
A global permission is a system control that defines WHAT a user is able to do in the application. For example, a user who has the Admin Access permission has access to administration.
Permission Sets
Permissions are granted to users through permission sets. A permission set is a group of global permissions created for users with common permission requirements. For example, you are a system administrator, a system administrators permission set is created and assigned to a system administrators team, and as a member of that team, you would gain those permissions.
If you are also a member of the finance team then your personal permissions would be the accumulation of both the supervisors and finance permission sets.
Updates to a permission set are applied to all users with that permission set.
Permission Sets and ACL Teams
Permissions sets are most efficiently assigned by using ACL teams. Add your users to ACL teams to determine what they can do in the system. Adding your permissions in this way allows you to easily maintain your permissions.
See Teams
Adding Permissions to User Interface Elements
Permissions can be used to control the display of data elements on a screen. This is controlled in the configuration for individual data capture elements.
| Data Capture Elements | Permissions Control |
|---|---|
| Aspects |
Aspects add sections onto the blade forms within the application. These can be added to users, teams, people, organisation, work types, connections and other elements within the application. To add permissions to an aspect click on the |
| Portals |
Portal widget can be configured to appear based on permissions. Go to Launchpad > Modeller > Work Types Select the work type you wish to work on and then go to Portal Designer |
| Service Portfolios | Creating a service portfolio will automatically create a permissions to access the portfolio, add this permission into your permissions sets to enable access. |
| Features | Some product features allow the definition of permissions to access the feature. |
 next to the aspect and select the permissions you wish to add.
Work Type Role Permissions
If global permissions control WHAT you can do, then role permissions control WHEN you can do it. Every organisation, team, or user has a role on a particular work type; the role permissions allocated to this role control what you can do on a work type.
Role permissions are limited to Read, Update, View Participants, and Assign Participants. Each user role on a work type should be granted role permissions.

Create a Permission Set
Create a Permission Set
You can create a permission set in administration. Permission sets can be assigned to teams or users.
To access permissions sets.
- Select Launchpad > Go to Admin > Security > Global Permissions - Granted
- You can now choose to create a whole new permission set, or copy and modify an existing permission set.
Creating a New Permission Set
- In the top right corner of the Global Permissions screen click Permission Sets > Add
- Enter Name and Description in their respective fields
- Your new permission set will be active by default, you can make it inactive by deselecting the Active check box
- Specify the global permissions of your new permission set by opening the top level drop down option (e.g. Admin) and selecting the check boxes of the permissions required (e.g. Admin Access)
- When you have added all the required permissions to your permission set, click Save

Cloning a Permission Set
- In the top right corner of the Global Permissions screen click Permission Sets
- Click on the burger menu of the permission set you want to copy > Edit > Clone
- Enter Name and Description in their respective fields
- Your new permission set will be active by default, you can make it inactive by deselecting the Active check box
- You can modify your new permission set by opening the top level drop down option (e.g. Admin) and selecting or deselecting the required permissions
- When you have added all the required permissions to your permission set, click Save on the new permission set blade.

Review
You have now successfully created a permission set. Now you can assign permissions to a team or user.
Assign Permissions to a Team
Assign Permissions to a Team
You don't have to manage every user's permissions individually, you can assign permissions to a team. Every team member will then inherit those permissions.
- Select Launchpad > Go to Admin > Teams > Internal Teams or External Teams.
- Select the team to which you want to assign permissions and click on its burger menu. (We strongly recommend that you only apply permissions to access control teams (ACL), signified by the lock icon)

- View/Edit Permissions You could manually add permissions to the team here, but we recommend using a permission set as it makes permissions management much easier. You can assign a default permission set or learn to create your own here: Create a permission set.
- Click on the Permission Set icon > click the burger menu of the permission set you want to assign > Apply Permission Set.

Review
You have now successfully assigned permissions to a team, all the members of this team will be granted these permissions.
Work Type Role Permissions
Role Permissions on Work Types
You can add a work type role permission to a role in the modeller. You can provide further control to the participant's access by defining what phase of the work type the permissions are granted on.
Add a New Work Type Role Permission
Add a New Work-type Role Permission
- Select Launchpad > Modeller > Participant role modeller > Roles.
- Select the participant to which you want to grant a new role permission > click the Action burger menu on the right side of the screen > Edit ShareDo Ownership.
- On the ShareDo Settings blade select the work type for which you want to add the role permission > Burger menu > Role Permissions.
- You can now add role permissions to your selected participant role by clicking the Permission Granted toggle switch to On > Save.
- Select the correct permissions for your role.
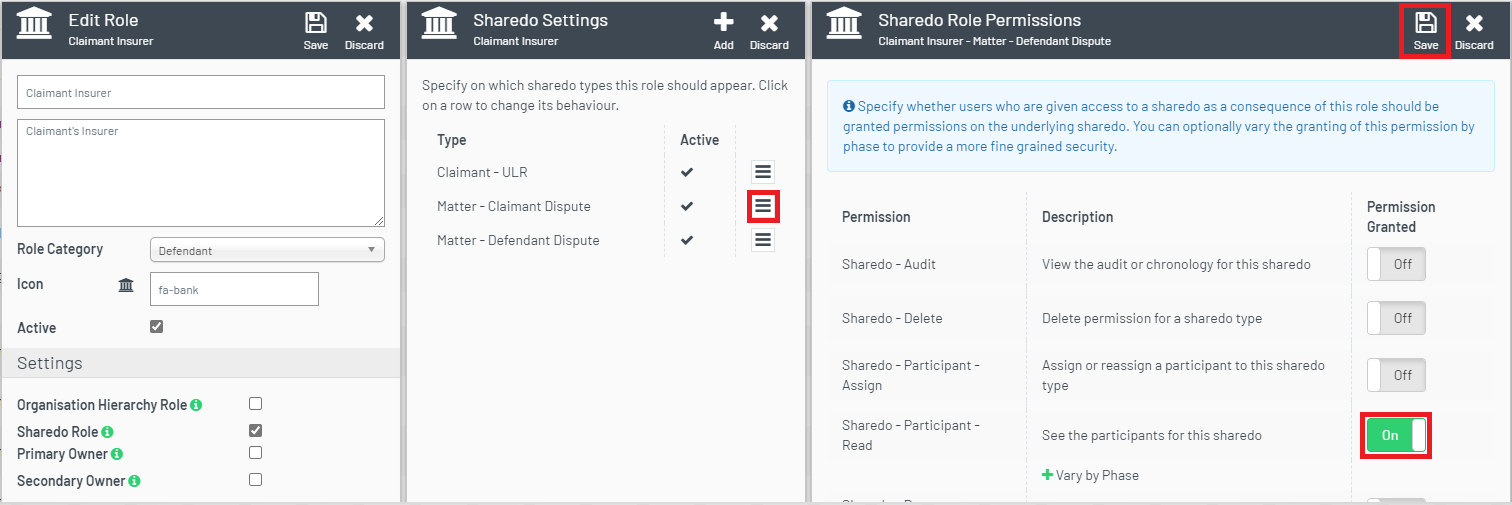
- You can also follow this process to remove a permission from a participant role, simply click the relevant Permission Granted toggle switch to Off.
Review
You have now successfully added a role permission to a participant role. You can provide further granularity to your permissions by varying role permissions by phase.
Vary Role Permissions by Phase
Vary Role Permissions by Phase
When you grant new permissions for a specific work type on a participant role, you can provide further control to the participant's access by defining what phase of the work type the permissions are granted on.
- Continuing from How To: Add a new role permission
- When switch the Permission Granted toggle on a work type to On, you see a new option to Vary by Phase.

- Click the + symbol, and a list of phase options shows, you can then select which of the phases you want the permission to be applied to. (Note; if you don't invoke Vary by Phase, the permission will be granted against all phases of the work type. Once vary by phase is invoked by switching a phase to On, the phases in the Off position will not be accessible to the participant role on that work type).

- Once you have selected the phases for which the role will be granted the relevant permission, click Save.
Review
You can now successfully vary participant role permissions by phase.