
Tasks represent the pieces of work that need to be completed by users. They provide helpful checklists and user interface links that get work done in an auditable, efficient, and effective way.
Tasks come in a variety of different types. All outstanding tasks appear in the worklist of the work item.
Get to know more about Tasks
A training module is available to help you get to know more about Tasks in Clio Operate on our learning management system, LearnUpon.
Get to know Tasks in Clio Operate
If you've not used our LearnUpon system before, see On-Demand Learning for details of how to register and access your account.
Here are two sample tasks within the worklist of a sample case:

| Due | The date the task is due to be completed, together with a count of the number of days that the task will become due in the future. As in the image above, a red warning icon is shown if the task is overdue. |
| Assigned to | The user or team that owns the task. Tasks can be manually or automatically assigned to different owners. |
| Type | A standard task is known simply as a task, but other task types are designed to deal with specific activities and accordingly, will behave differently when actioned. For example, you might have a search task which automatically begins a duplicate search. Other popular task types include telephone calls, hearing requests, and outbound emails. |
| Work Item | A specific description of what work this task will complete. |
| Phase | A task will move through different phases, each requiring specific work from initial creation to task completion. Note that different users may be responsible for each phase. For example, a case review task may have 3 phases: New > In Progress > Complete. |
| Action | Actions that can be performed upon the task. We will cover these later in this article. |
| Created | The date that the task was created. |
Note that you can customise the columns in the worklist by clicking the more options (burger) menu and selecting Choose Columns. You can also filter and sort the contents of columns by clicking the header and making your selections.
Finally, note that the workbench contains worklists which show any outstanding tasks that belong to you or your team members. This is covered in the Worklist section below.
How are Tasks created?
Tasks can be created automatically as part of the workflow process. They can also be created manually, either as part of a matter or as a completely ad-hoc task that is not connected to any piece of work (though it can be retrospectively attached to a piece of work if required).
There are numerous different types of tasks, each with their quirks.
We will begin by discussing the basic principles of tasks, manually creating a standard task as an example, before exploring other task types.
Manual Task Creation in a Work Item
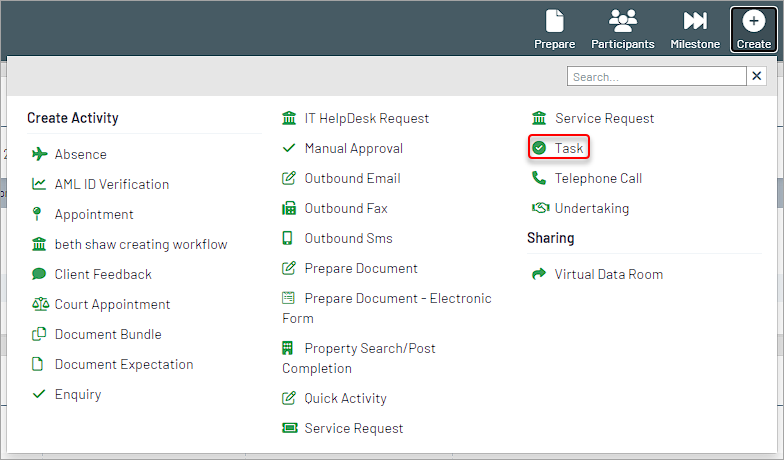
To manually create a new task, navigate to an open work item, such as a case or an instruction, and select the Create (or Task) button on the menu bar.
|
A list of available task types appears. A standard task type is highlighted in this image. Click Task. |
 |
| The New Task blade opens. |  |
Task Properties
Task properties can be set or amended anytime, provided the task has not been completed.
Let's review the various task properties.
| Section | Property | Description |
|---|---|---|
| Details | Reference | A unique, usually system-generated reference for a task. You can use this reference to search for the task. |
|
Title
|
A short, meaningful description that will help other people understand what the task is for, e.g., Collate and review Witness Statements. This description will be pre-defined when a workflow automatically creates a task. |
|
|
Description
|
A larger field that allows you to provide more information about the task: there are buttons to create lists, links, or generally format this information. | |
|
Refers To
|
This is the item of work that this task is associated with. For example, this could be a matter, a hearing, or an instruction. Clicking this entry will open a new blade containing all the key facts that need to be captured for the work item. (Note this is the same blade that opens from the key facts widget). |
|
|
Due Date
|
The task's due date will appear in worklists and indicate the intended date by which the task should be completed. To set or change a due date, click inside the box to display a calendar to choose a date. By default, the due time is midnight (at the end) of the selected day. To set or change a specific due time, click on the time next to the date and select a time. Remember to confirm the time zone is correct. To set a reminder for the task, click the bell icon to the right of the due date. |
|
|
Reminders
|
If a reminder is set when entering the due date, the reminders field will be displayed. A reminder can be set for manually created tasks, which generates a notification at the chosen date/time. For those tasks created automatically, reminders can take the form of notifications, emails or further tasks. To create a reminder, click on Select a period before (or after) the task is due and enter a short reminder description.
Click on the green tick to confirm. |
|
|
Assigned To
|
The user or team to whom the task is currently assigned. It can be changed to another user/team if required. When creating a new task, the owner will default to the current user. |
|
| Related Documents | Any documents related to the task are shown here. | |
|
Tags
|
Tags
|
Tags can be used to group tasks or to filter within worklists and the chronology tab. To assign a tag, select from the list of pre-defined tags or begin typing the name of a new tag you wish to create - clicking the Add Option link will create and assign your new tag. |
| Work Scheduling | Start Date / End Date | Choose to mark the work as started and set the end date. You can link to the due date to set the end date. |
| The following options are only enabled once the blade has been saved. | ||
|
Related Documents
|
Files
|
Opening this aspect allows users to upload any documents that are related to this task. For example, if the task is to carry out a bankruptcy search on someone, the results could be uploaded onto the task. Click the > icon to open the related documents blade, where you can attach/unlink files, print, or send the file to a recipient. To add files, click Attach to open a blade containing all the documents linked to this case. Select any documents you wish to relate to this case and click Confirm.
To remove any Related Documents, tick the checkbox to the left of their title and click Unlink. |
|
Time
|
Time
|
This is the elapsed time spent creating and working on this new task. There are options to pause/stop the clock and to open a separate Time entries blade to select a specific time code and override any elapsed time values. The time will be automatically added to your timesheet once the task is created. |
|
Comments
|
Comments
|
Clicking on the navigation bar opens the blade and allows the comments to be viewed or captured. They will also appear in the comments widget on the portal. These comments may also appear on the parent work item if configured to do so. |
|
Action Plan & Related Tasks
|
This blade shows the current overall status of the task together with any individual checklist items or related tasks. This blade can be seen across other activities, not just Tasks. For example, it forms part of the blade presented via the Edit option on the action bar. In those instances, the data shown in the progress, checklist and related tasks sections relate to the entire work item, e.g., a matter. |
|
|
Progress
|
Progress shows the current phase of the task. For all standard tasks, there are 3 phases: New, Doing (in progress), and Done. However, other task types have their own phases. How to move between phases is covered below. |
|
|
Checklist
|
A single task may comprise several items that need completing. E.g. a triage review may contain the following items to be completed:  Tick the radio button to the left of each checklist item to confirm the work has been completed. Note that some tasks have Phase Guards, which prevent a task from moving to the next phase until all the checklist items have been completed. Typically, the number of checklist items to be completed is presented on the action plan nav bar:  Checklists are a crucial part of a task's function. The View process detail section below shows an example of this. |
|
| Related Tasks | All tasks related to this particular task are presented. See the section below on how to relate tasks manually. | |
| Participants | Manage Participants | This opens the Manage Participants blade. |
 .
.

Saving Changes to Tasks
The Save, Save & Close, and Exit buttons are to the top right of the Ribbon Bar.
When creating a new task:
- The first time the Save or Save & Close buttons are clicked, the task is created.
- Clicking Close would exit the creation process, and all information entered so far would be lost when the blade was closed.
Existing tasks:
- Save / Save & Close saves any changes made.
- Close closes the form, and any changes are lost.
Task Worklist
Tasks are inserted into the worklist of the work item they are related to – for example, a case.
In the example below, a new task has been manually created and is at the top of the matter worklist.

Dates in the Due column are highlighted with coloured blocks and numbers. This list shows what they mean:
 |
The task is overdue by the number of days indicated. |
 |
The task is due today or within the next 3 days. |
 |
The task is due between 4 and 7 days. |
 |
The task is due in more than 7 days. |
|
Click on the actions “burger” menu to the right of a task. The following menu provides shortcuts to functions, allowing the user to action on the task in several different ways. These menu options will be covered below. |
 |
Worklist Filters
When you open a matter, the left-hand worklist menu contains options to display and filter this matter worklist:
|
 |
All worklists can also be sorted/filtered using the column headings.
The owner of each outstanding task will also see the tasks in their worklist and the worklist of any team they belong to.
Actioning Tasks
Changing Phases
A task will move through different phases, each of which may require specific work to be undertaken, from initial creation through to task completion.
When a task blade is opened up, we can see that the top ribbon bar displays icons allowing the user to control the task phase (with several other options).

The task shown in the image above is in the New phase, as shown below the task title. The phase is presented here (and in the Action Plan & Related Tasks nav bar). We also saw the phase column on the worklist.
Buttons on the ribbon bar will allow the user to move the task between different phases. Note that as there are different types of tasks, each with its own set of phases, the ribbon bar buttons are contextual and will vary according to the task/phase being worked on.
All phase changes are audited and presented in the chronology tab.
In Progress
The task owner shows that they are working on it by clicking the In Progress button. Phase changes can be seen by clicking the Action Plan & Related Tasks nav bar:
![]()
The date and who undertook the change is recorded:

The worklist will also show the new phase:
![]()
The ribbon bar may change following each phase transition.
To revert the task back to the New phase, click the New button.
To delete the task altogether, use the Remove button.
Complete
When work has been completed on the task, click Complete.
This action may trigger a related event, depending upon the type of task. For example, another task may be automatically inserted, or a document or email may be automatically produced.
Other Task Actions
Reassign
This ribbon bar button ![]() allows you to choose who the task should be assigned to (another user or a team).
allows you to choose who the task should be assigned to (another user or a team).
|
 |
 icon to review/amend the details of your chosen user/team.
 icon to reassign the task to your chosen user/team.
The new owner will be notified that the task has been placed in their name.
Take Ownership
If a task is owned by anyone but yourself, you will note that:
- The buttons to move a task between phases or delegate are removed.
- The Take ownership button appears
 .
.
Clicking on the Take Ownership button will make you the owner of the task.
Task More (Burger) menu
|
This menu provides several options, including:
|
 |
Creating a Related Task
|
To create a new task that links (relates) to the current task, click on Task from the burger menu to force a new task blade to appear. As with any task, add a title and set any properties. E.g. owner, due date, etc. Clicking on Save & Close creates the new task and links to the current task. |
 |
|
The bottom Action Plan & Related Tasks navigation bar will update to show this new related task. E.g. Note that the Related Tasks counter is now 1. |
 |
|
Click on the navigation bar to show the blade and view the new related task. The task is also inserted into the worklist. |
 |
View Process Details
|
This menu item will appear for certain tasks automatically inserted into the worklist. These are typically tasks that mark key milestones in the overall process. In this example, we can see some of the processes leading up to the triage review task. |
 |