
Create or edit
Create or edit a phase plan
Use the Phase model menu item of the Work Type Modeller to create a phase plan that defines all the phases a work type can inhabit. Use the same menu to edit elements of a phase plan.
You can access the phase plan from the left-hand navigation menu (Phase model) or the Edit plan link on the Advanced Settings widget.
Create a phase plan
Follow these steps to create a phase plan and add phases to it.
- Select Open Modeller from your Launchpad. Then click Work types in the left-hand menu to open the Work Type Modeller.
- Double-click the work type for which you want to create the phase plan.
- On the left-hand navigation menu, click Phase model.
- On the right of the header banner, click Add Phase.
- In the Add new phase blade, enter the phase Name and Short Name, and optionally enter any further information. If your phase plan starts from this point, click the Start toggle to on.

Phase Behaviour
| Start | Setting this On marks this phase as where the plan starts. |
| Open | If this is On, it means the task is open and active. If it is toggled Off, the task is considered closed, which is useful for ‘completed tasks’ lists. End points on a phase plan would have the Open toggled off. |
| Removed | Toggling Removed to On sets the phase as removed (rather than closed) so it can be excluded from a list view. Use this, for example, if you abandon the work item. |
| System Closed | System Closed is not for end points on a phase plan - it is a way of filtering out and 'soft-deleting' work items so that you don't include them in reporting etc. The Auto-close Descendants feature also uses it to identify the phase the work item should be put to if it is auto-closed. |
- Click Confirm after completing the fields.
- You can now see your phase in your phase plan. Click and drag the phase plan to move it around the screen, or double-click it to edit.
- Repeat the steps above to create any other phases you want to add.
If you are adding a phase to an inherited phase plan, the phase is added to any children of that plan.
Continue adding phases and transitions until you have built your required phase plan. Drag new phases dropped onto the plan to the position you want them in.
Add a transition between phases
Once you have two or more phases in your plan, click Add Transition to create a path between the phases of the work item.
- On the work type banner, click Add Transition to open the Add new transition blade.
- Enter a Name, From Phase, To Phase, and optionally configure the Behaviour toggles. Click Confirm.

Transition Behaviour
| Optimum Path | When set On, it indicates that this transition is part of the optimum path for the work type. |
| User Driven | Indicates whether end users with the correct permissions can make this transition through the UI. |
| Close UI | This is used to close the UI for the work type when the phase is reached. For example, if the phase will close the task, the UI should close. |
|
Always show phase change information / Comment is mandatory |
If On, when the phase changes, a blade opens, showing the change information. This blade also shows a text entry box for a comment when mandatory comments are set on. |
| Reason option set | Select the option set that contains the list of reasons you want users to choose from to indicate the reason for the phase transition. |
- Your transition is represented as an arrow between your phases.

If you add two transitions between the same phases, the arrows overlay each other. To fix this, right-click the canvas anywhere outside of the phases to open a context menu. Click Apply Process Layout. Your transitions should now show correctly.

Edit elements of a phase plan
To edit any phase or phase transition in a phase plan, double-click the element to open the Edit blade. Make whatever changes you require and click Confirm to apply the change.
For information on configuring phase related subfeatures, see the Understanding Global Features article.
Create a copy of a plan
When you create a derived type of a work type, the derived type inherits the parent's phase plan. To edit the derived type's phase plan, click Create Copy of Plan on the right-hand side of the phase plan banner. The copy of the plan allows you to change an inherited plan without having to create a new one or edit the parent, which would affect other matters.
If work items already exist for the derived type of a work type, you do not see the Create New Plan or Create Copy of Plan options in the screenshot above. The work items need to be 'nuked' before you see those options.
The Edit phase plan details blade opens, where you must enter a new name for the plan. You can now edit the new plan's elements and save the plan for your derived work type. You can remove phases and transitions by right-clicking and deleting them or add phases and transitions from the banner icons.
If you select Edit Inherited Plan, any changes you make are made to all work types using the inherited phase plan.
Edit an inherited phase plan
You can change the phase plan for a work type by editing the phase plan it inherits from its parent. This allows you to make changes to the phase plans of multiple related work types in one simple process.
- Select Open Modeller from your Launchpad. Then click Work types in the left-hand menu to open the Work Type Modeller.
- Double-click the work type whose phase plan you want to edit.
- You can access the phase plan either from the left-hand navigation menu (Phase model) or from the Edit plan link on the Advanced Settings widget.
- On the right-hand side of the phase plan banner, click Edit Inherited Plan to open the phase plan for the parent work type.
- You can now edit the phase plan using the icons on the top banner. Any changes are inherited by all the work types below this work type in the hierarchy.
For example: In the screenshot below, any edits to the top-level Payment Request phase plan pass on to Disbursements, Secured Debt, and Settlements.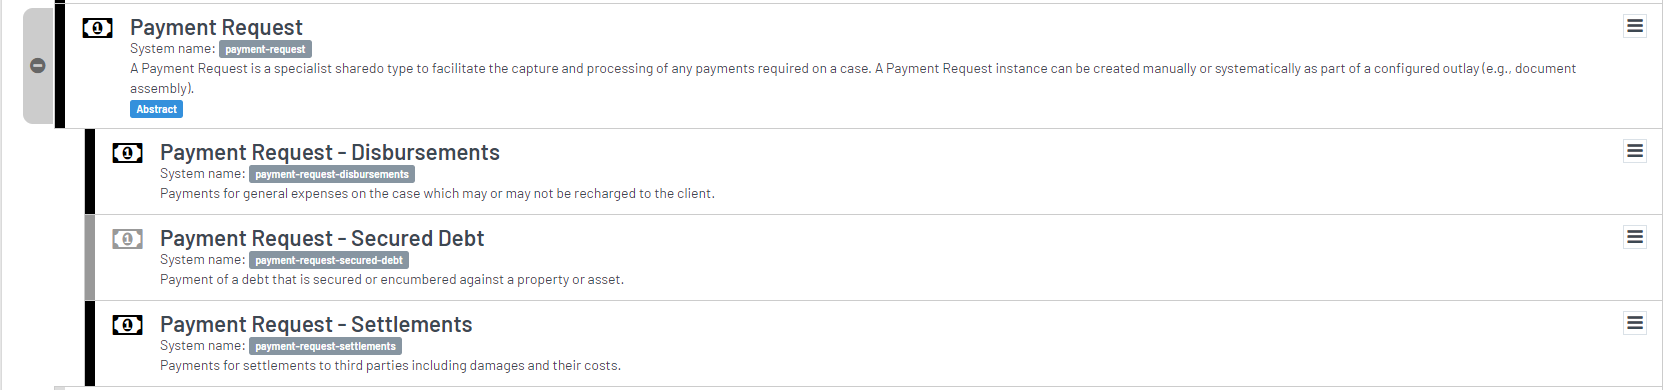
Review
This article showed you how to create a phase plan, phases and transitions in the plan, and how to edit elements of the plan.
Add a phase
Add a Phase to a Phase Plan
You can add a phase to a phase plan in Modeller to tailor the workflow of a work type to your specific requirements.
Steps to add a phase to a phase plan
- If you are already in the phase model, then jump to Step 3, otherwise open Launchpad > Modeller > Work-Type Modeller. Double-click the work type to add the phase.
- You can access the phase plan from the left-hand navigation menu (Phase model) or the Edit plan link on the Advanced Settings widget.
- Click the Add Phase + icon on the work type banner to open the Add new phase form.
- Enter a Name, Short Name, and optionally, any further information. Click Confirm.

- Your new phase drops onto your phase plan, where you can drag it to another location on the screen.

Review
You can now successfully add a phase to your phase plan.
If you are adding a phase to an inherited phase plan, the phase is added to any children of the phase plan.
Add a transition
Add a Transition to a Phase Plan
You can add a transition to a phase plan to allow users to move from one phase to another.
Steps to add a transition to a phase plan
- If you are already in the phase model, skip to step 3. Otherwise, open Launchpad > Modeller > work type Modeller. Double-click a work type to add a transition.
- You can access the phase plan from the left-hand navigation menu (Phase model) or the Edit plan link on the Advanced Settings widget.
- On the work type banner, click the Add Transition+ icon to open the Add new transition form.
- Enter a Name, From Phase, To Phase, and optionally configure the Behaviour toggles. Click Confirm.

- Your transition is represented as an arrow between your phases.
Review
You can now successfully add a transition to a phase plan.
Phase features
Phase Features
A phase feature is a capability that you enable on a specific phase of a work type. Instead of a behaviour being on for the whole work type, a phase feature switches it on only while a work item sits in the phase you choose.
For example, you can allow finance transactions to be recorded on an active phase but not on a draft phase, or mark a proceedings phase as the point at which a matter becomes litigated. The same work type can behave differently at each stage of its lifecycle.
A phase feature is always a combination of three things: the work type, the phase, and the feature. Clio Operate checks that combination and uses the result to show or hide widgets and pages, filter list views, apply the rules that decide what a work item can do, and trigger automatic actions such as spawning a related work item.
Some phase features are simple on or off switches. Others carry their own configuration, such as which approval model runs, which offer types are available, or which transitions a data table takes on success or failure. You can also use phase features to filter list views. A list view can be scoped to show only work items whose current phase has a given feature enabled, configured through the burger menu under Manage this list view.
Are phase features on by default?
A phase feature only takes effect on the phases where it is switched on, so it is always a deliberate setting rather than something that happens on its own. Whether a feature is already switched on depends on how the work type was built. Work types created from a starter or accelerator configuration usually have the relevant features enabled, while a work type built from scratch has none until you add them.
Phase features do not inherit down the hierarchy
Phase features do not inherit down the work-type hierarchy. A feature enabled on a phase in a parent work type is not carried onto the same phase in a child work type. Clio Operate checks each feature against the exact work type and phase, and does not fall back to the parent work type.
This is different from how phases themselves behave. When you add a phase to an inherited phase plan, that phase is added to the child work types as well. Enabling a feature on that phase is not. If a child work type needs the same phase feature as its parent, enable it again on the child.
Available phase features
The following phase features are available in Clio Operate. The set available on a work type depends on which global features are enabled and which features apply to that work type, and implementations can add their own, so an environment may show more.
Most phase features are a simple on or off switch. Some have additional configuration, where you set how the feature behaves on that phase. The Additional settings column shows what you configure.
A dash in the Global feature column means the feature does not sit under a global feature, and a dash in the Additional settings column means there is nothing more to configure.
| Phase feature | What it does | Global feature | Additional settings |
|---|---|---|---|
| Always show in phase | Keeps hidden and system tasks visible in worklists and search results while the work item is in this phase. | Always Show | — |
| Anti-Money Laundering matter configuration | Makes AML identity-verification checks available while the work item is in this phase, and controls which participant roles can start them. With no roles configured, all roles can. | CreditSafe | The participant roles allowed to start AML checks. Leave empty to allow all roles. |
| Approval Phase configuration | Starts an approval workflow when a work item enters this phase. You set which approval model runs and which transitions the item takes when approved or rejected. Inline approval is on by default. | Approvals | The approval model to run, the transitions to take when approved or rejected, whether inline approval is allowed, an optional message for approvers, and an optional transition when an approval is retracted. |
| Approval Work Type outcome configuration | Marks each outcome phase of an approval work type as either an approval (pass) or a rejection (fail), so Clio Operate knows what a completed approval represents. | Approvals | Whether the phase represents an approval (pass) or a rejection (fail). |
| Budgets Work Type Availability | Makes budgeting available for the work type and defines which budget structures apply. | Budgets | The budget structures that apply to the work type. |
| Bulk Complete Target | Identifies the phase that work items move to when they are completed in bulk from a list view. | — | — |
| Can Edit Document Generation Form | Lets users edit the document generation form while in this phase. Without it, the form is read-only. | — | — |
| Can Submit Time | Allows time to be recorded against the work item while it is in this phase. | — | — |
| Cancelled Phase | Identifies phases that represent a cancelled state, so reporting can leave them out of average lifecycle figures. | — | — |
| Cancelled/Complete Phases | Treats the phase as the end state for an appointment or key date, and removes items in this phase from synced Exchange/Outlook calendars and from calendar list views. | Exchange Calendar Sync | — |
| Case litigated when reaching | When a proceeding reaches this phase, sets the parent matter's litigated flag to true. | Litigation | — |
| Case Milestone Chronology | Adds an entry to the work item's history when it reaches this phase, for example "Milestone achieved: Won". | — | — |
| Channel send failed | Identifies the phase that represents a failed delivery attempt, so the delivery shows as failed. | — | — |
| Completion | Identifies the completion phase. Used on real estate matters. | — | — |
| Configure the phases for auto close | When a work item enters this phase, automatically closes its open child and descendant work items. | Auto Close Descendant Work Items | — |
| Configure the phases for Recording Posted Transactions | Marks the phase at which associated account transactions are set to Posted, finalising them in the ledger. | Chart of Accounts | — |
| Configure the phases for Recording Reverse Transactions | Marks the phase as a reversal point, setting associated account transactions to Reversed and triggering reversal handling. Valid only when coming from a posted phase. | Chart of Accounts | — |
| Configure the phases for Recording Wip Transactions | Marks the phase at which associated account transactions are set to work-in-progress, so they remain editable. | Chart of Accounts | — |
| Data Table Chronology | Adds an entry to the parent work item's history when a data table reaches this phase. | — | — |
| Data Table Phase Transition configuration | For data-table work items, defines the success and failure transitions taken automatically when an upload completes. Both transitions must be configured. | Data Table Uploads | The transition to take when a data table load succeeds, and the transition to take when it fails. |
| Delete Generated Documents | When a work item enters this phase, automatically deletes the documents that were generated for it. | — | — |
| Document Delivery - Channel send phase | Lets the delivery channel send automatically while in this phase, for example an e-signature request. | — | — |
| Document Delivery - Document Delivered | Identifies the phase that means the document has been delivered, so the delivery shows as sent. When every delivery task is in a delivered phase, the parent task moves on automatically. | — | — |
| Document Delivery - Generate Bundle | When a work item enters this phase, combines the related documents into a single PDF bundle for print-to-post. | — | — |
| Document Delivery - Regenerate Document | When a work item enters this phase, regenerates the document with its delivery tags, for example the print date, before it is sent. | — | — |
| Document delivery required | Blocks the transition into this phase until an active document delivery channel has a task in a sending or sent state. | Document Delivery | — |
| Document Expectation Chronology | Adds an entry to the parent work item's history when a document expectation reaches this phase. | — | — |
| Document expectation waiting phase | Identifies phases where a document is still awaited, so waiting documents sort to the top of the document expectations list. | — | — |
| Document Generation Chronology | Adds an entry to the work item's history when a document is generated. | — | — |
| Document refresh | Lets users manually refresh (regenerate) previously generated documents while a Prepare Document task is in this phase. Not available on the starting phase or where the template generates documents automatically. | Document Refresh | — |
| Filing Complete | Blocks the transition into this phase until all attached documents are filed or marked as not required. | — | — |
| Generate Document | Identifies the phases in the document-preparation workflow where a document is generated. | — | — |
| Ignore mandatory fields on transitioning to this phase | Lets a work item transition into this phase even when mandatory fields are not completed. The values entered are not saved. | — | — |
| Include In Reports | Includes work items in this phase in reporting, even when the phase is still open. | — | — |
| Invoice Chronology | Adds an entry to the invoice's history when it reaches this phase. | — | — |
| Invoice Closed Phase | Identifies the phase that represents a closed invoice. Used to prevent closure until the invoice is fully paid, and to locate the closed phase in invoice workflows. | Invoices | — |
| Invoice Payment Plan Phase configuration | Designates what each payment-plan phase represents (active, paused, lapsed or complete), which drives whether payments can be recorded and where the plan sits in its lifecycle. | Invoice Payment Plans | Which state the phase represents: active, paused, lapsed, or complete. |
| Legal Forms Phases | Maps eForm task phases to lifecycle stages (creating, in progress, completed, deleted), so form processing is independent of phase naming. | Legal Forms | Which lifecycle stage the phase represents: creating, in progress, completed, or deleted. |
| Litigation matter type configuration | Defines which proceeding types can be raised under a matter type, and controls by phase whether the raise and receive proceedings menu appears. | Litigation | The proceeding types that can be raised under the matter type. |
| Lock Fee Estimates | Locks the fee estimates on the work item so they cannot be edited while it is in this phase. | — | — |
| Manual Approval Submitted Phase | When a work item enters this phase, assigns the approval participants: the manual approver becomes the primary owner and the current user becomes the requestor. | — | — |
| Move instruction to this phase on matter spawn |
When a matter is spawned from an instruction, moves the instruction itself to the phase that has this feature. This only moves the instruction's phase. For what happens to the instruction otherwise, and what carries over to the new matter, see What carries over when a matter spawns from an instruction. |
— | — |
| Offer Chronology | Adds an entry to the parent work item's history when an offer reaches this phase. | — | — |
| Offers made matter and proceeding configuration | Defines which "offer made" types are available on a matter or proceeding, and controls by phase whether offers can be recorded. | Offers | The "offer made" types available on the matter or proceeding. |
| Offers received matter and proceeding configuration | As above, for "offer received" types. | Offers | The "offer received" types available on the matter or proceeding. |
| Payment is being requested | When a payment request enters this phase, records the date it was requested. Also identifies payments that are out for payment. | — | — |
| Payment must have a transaction when transitioning to this phase | Blocks the transition into this phase until the payment request has at least one transaction. | — | — |
| Post Completion | Identifies the post-completion phase. Used on real estate matters. | — | — |
| Show in transaction log | Shows the payment in the finance transaction log even while its phase is still open. | — | — |
| Spawn a new matter from the sharedo | When a work item enters a phase with this feature, spawns a new matter from it. | — | — |
| Statement of Works Required | Blocks the transition into this instruction phase until a statement of work has been selected. | — | — |
| Task Milestone Chronology | Adds an entry to the parent work item's history when a child task reaches this phase. | — | — |
| Transition Instruction to Matter on Phase |
Marks the instruction phase that spawns a matter. When an instruction enters this phase, Clio Operate creates the matter, links the two work items, and makes the instruction a child of the new matter. For what data carries over to the new matter, see What carries over when a matter spawns from an instruction. |
Matter Spawning | — |
| Un-set litigated when reaching | The inverse of Case litigated when reaching: when a proceeding reaches this phase, clears the parent matter's litigated flag. | Litigation | — |
Example: configure an instruction phase plan to spawn a matter
In Clio Operate, an instruction represents a piece of work before you are engaged. Once an instruction is won, it spawns a matter, which becomes the active case. You configure this with the Transition Instruction to Matter on Phase feature, enabled on the instruction phase where the matter should be created.
When an instruction moves into that phase, Clio Operate creates the matter, links the two work items, and makes the instruction a child of the new matter.
Steps
- Modeller > Work Types.
- Open the instruction work type and select phase plans.
- Select the phase where the matter should spawn and Edit Phase.
- Open Manage Phase Features
- Enable the Spawn a new matter from the sharedo feature.

- Save the phase plan.
Enabling the feature tells Clio Operate to create the matter from this phase. When an instruction enters the phase, the matter is created and linked automatically. You can enable the feature on more than one instruction phase if a matter can be spawned from several entry points.
Enabling the feature controls when the matter is created. It does not determine what data carries over to it. See What carries over when a matter spawns from an instruction for the full breakdown of what always carries over and what depends on your configuration.
Spawning a matter from an instruction
What carries over when a matter spawns from an instruction
An instruction is the work item that captures a piece of work before your firm is engaged. Once it is ready to proceed, it spawns a matter, which becomes the active case. The instruction and the matter are separate work items: spawning creates the matter and links the two, it does not convert the instruction in place.
This article explains what data moves from the instruction to the matter when this happens, and what does not. Some of it carries over on every spawn. The rest depends on how your Clio Operate environment has been set up, so it varies between firms and sometimes between work types on the same firm.
If you need to set up spawning itself, see Phase Features for the Transition Instruction to Matter on Phase and Spawn a new matter from the sharedo settings.
Two kinds of carry-over
There are two distinct groups of behaviour, and telling them apart matters if you need to say whether something will carry over for a specific client or matter type:
- Always on. This group runs on every spawn, regardless of how the environment is set up. It is described in What always carries over below.
- Depends on configuration. This group only runs if it is part of that work type's spawn setup. It varies by firm and by work type, and is described in What depends on configuration below.
Key dates sit across both groups. Two specific dates always carry over as part of the core spawn action; every other key date depends on configuration. See the notes in each section.
What always carries over
| Field | What happens | Notes |
|---|---|---|
| External reference | Always carries over. | No configuration involved. |
| Reference | Carries over by default. | Can be switched off as part of the spawn setup. If a matter's own reference clearly does not match the instruction's, this is most likely why. |
| Title | Does not carry over by default. | Off by default because the matter's title is normally generated automatically once the matter exists. Can be switched on as part of the spawn setup if the instruction's title should be kept instead. |
| Description | Carries over into the new matter's instruction detail. | |
| Case type and work type | The instruction determines what kind of matter is created. | |
| Jurisdiction | Carries over only if it is an allowed option for the matter's case type. | If it is not an allowed option, the jurisdiction field is left blank on the matter, with no warning shown. If a jurisdiction seems to be missing, check the allowed options for that case type before treating it as a fault. |
| Statement of work | The instruction's preferred statement of work becomes the matter's statement of work. | Spawning fails outright if the instruction has no matching or preferred statement of work. |
| Instruction date and incident date | These are the only two key dates that carry over as part of the core spawn action. | Every other key date depends on configuration, see What depends on configuration below. |
| Linked case relationship | The instruction and matter are linked, with the instruction shown as a child of the matter. | Where this displays depends on how your portal is set up, for example in a Case Explorer widget. Your administrator can lock this link so it cannot be removed, in the Matter Spawning global feature. |
| The instruction and everything below it | The whole instruction, including any child work items, moves under the matter. | Because of this, chronology entries, tasks and other child items linked to the instruction display on the matter without being copied. See If something looks like it should have carried over but has not. |
| Matter spawned event | Spawning triggers a matter spawned event. | Any automation or workflow configured to respond to this event runs as part of the spawn. |
What does not carry over
- Electronic signature. A new signature record is created for the matter at the point of spawning. It is not the instruction's signature copied across.
- Client organisation. The matter's client organisation field is set to your firm's default organisation, not the instruction's client. The client as a participant is a separate thing and carries over only if participant copying is configured, see below. Do not assume the two are linked: a matter can show the correct client participant while the client organisation field still shows the default.
What happens to the instruction itself
Carry-over is about the new matter, but closing the source instruction happens alongside it, covered in What depends on configuration below under "Closing the instruction."
Whether the instruction closes at all depends on how your environment is set up. If it stays open after spawning, this is why. Which phase it moves to, if it does close, is controlled by the Move instruction to this phase on matter spawn phase feature, which you can set in Modeller on whichever phase you want the instruction to land on. If no phase has this feature enabled, the instruction moves to a default closed phase instead.
Either way, moving the instruction to that phase is what applies the closure. There is no separate step that closes the instruction without also moving its phase.
What depends on configuration
Beyond the core spawn action, further data can carry over depending on how spawning was set up for your firm. This can vary between work types, so do not assume a specific item will or will not carry over without checking. Contact Clio Operate support to confirm what applies to a specific work type.
| Area | What it carries | Things to check |
|---|---|---|
| Key dates | All key dates from the instruction, created as new entries on the matter. | The instruction's key dates can also be configured to close automatically once copied. |
| Participants | Specific participant roles from the instruction to the matter. | Runs immediately, rather than waiting for the standard participant synchronisation. Commonly used to get the client participant onto the matter straight away. If the configured role does not exist on the instruction, nothing carries over for that role and no error is shown. |
| Participant role connections | Relationships between participants. | |
| Participant synchronisation | Rechecks and reapplies the standard rules that automatically add participants. | Ensures these rules finish running before anyone opens the new matter. |
| Documents | Related documents, into a target folder or repository. | Can include documents from child work items, depending on configuration. |
| Custom attributes | Attribute values stored against the instruction. | |
| Form builder data | Data captured through custom forms on the instruction. | |
| Scorecards | Metric scores. | Only carries over where the scorecard applies to both the instruction and the matter's work type. |
| Commercial model | Estimates, delivery cost structures and budgets. | Each part of this has its own switch, so some elements may carry over while others do not. |
| Related links | Other work items linked to the instruction. | Can be limited to specific link types. |
| Work type change and clean-up | Changes the matter to a different work type if configured, and removes participant roles, connections or scorecard metrics that no longer apply. | |
| Incident details | Details of an incident recorded on the instruction. | |
| Properties | Property records associated with the instruction, such as title number, tenure, location, construction and size. | Relevant to conveyancing and other property-related work types. |
| Litigated flag | Whether the matter is already recorded as litigated. | Only carries over if the instruction was itself recorded as litigated. |
| Closing the instruction | Moves the source instruction to a closed phase once the matter is created, using a closure reason from your Lead Closure Reasons option set. | See What happens to the instruction itself for how the target phase is chosen. |
This list covers the steps included with Clio Operate. Some firms have extra steps added for a specific practice area, so you may see behaviour on your environment that is not listed here. If in doubt, contact Clio Operate support rather than assuming this list is exhaustive.
If something looks like it should have carried over but has not
- Confirm the setting applies first. The most common cause is that the relevant item in What depends on configuration is not part of that work type's setup. This is a configuration choice, not a fault.
- Jurisdiction is blank. Check the allowed jurisdiction options for the target case type. If the instruction's jurisdiction is not one of them, it is dropped silently.
- Client participant is missing. Check three things in order: whether participant copying applies to that work type, whether the configured role exists on the instruction, and whether the standard rules for adding participants automatically apply to that role. Remember that the client organisation field is separate from the client participant, see What does not carry over.
- Matter title looks different from the instruction's. This is expected. Title copying is off by default, see What always carries over.
- Something that appeared on the matter has disappeared. If it appeared because the instruction was moved under the matter rather than genuinely copied, unlinking or deleting the instruction removes it from the matter too. Genuine copies, such as documents or key dates copied under configuration, are not affected.
Creating your work type phase plan
Quick Start 008 - Creating your work type phase plan
Learn how to create a phase plan for your work to show how your work is progressing.